How to Add a Custom Domain to Your Website
📅 06 December 2024 | 🕒 9 minutes to read
This is the 9th post in the building kits-dna series. Don't want to use GitHub Pages default domain for your site? Here's how to get setup using Squarespace domains.
♻️ Update 03/03/2025
I've updated this post with steps required to setup a custom domain if deploying from Netlify.
# What Is a Domain?
A domain is simply the name or the URL of your website. The domain for kits-dna is kitfrance.com. This is a custom domain that I purchased and configured to work with the hosting provider (GitHub Pages). GitHub Pages will give you a default domain but a custom domain is just that wee bit nicer.
# Squarespace
I was going to use Google Domains (because it's Google) but their site redirected to Squarespace domains. Squarespace offer website hosting and building but I only use the domain name product. Being honest I didn't shop around, I thought the price was acceptable and I liked the added features:
- WHOIS privacy
- SSL
- Premium DNS
⚠️ Warning: DNS is key. Whether you use Squarespace or not, make sure you either know how to configure DNS, or you use a domain registrar who offer a DNS service.
# Cost
The domain costs £16 per year, with a first year discount - thanks Squarespace 😄 - prices depend on the domain suffix / extension e.g. .com or .co.uk.
# How to Setup Your Squarespace Domain for GitHub Pages
- Find and purchase a domain
- You should be prompted to create an account. If not, create an account
- Verify your email address. This activates your domain
- Login to your account
- Click on your domain
- Go to DNS, and then DNS Settings
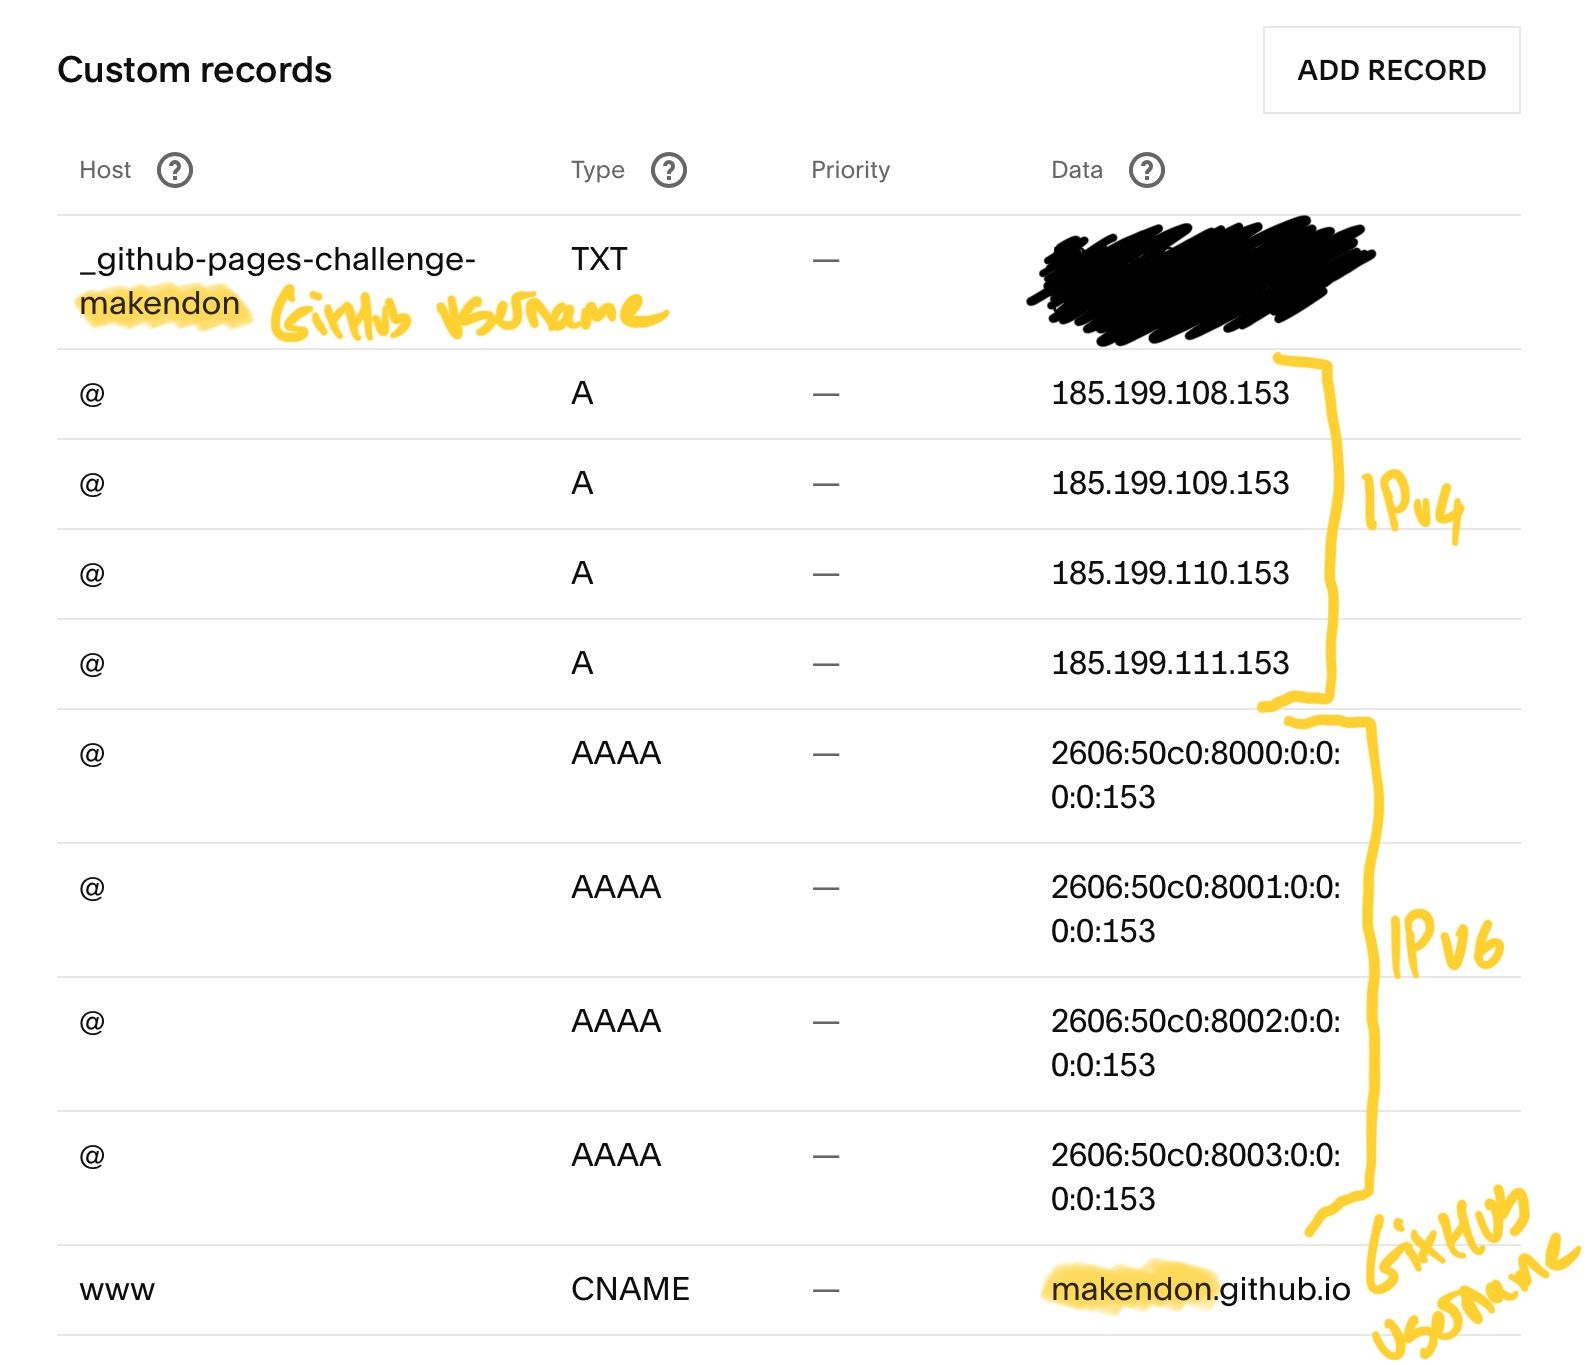
- Add custom records as per screenshot

- The
TXTrecord allows GitHub Pages to verify your domain - The IP addresses are GitHub Pages servers and are publicly available in documentation
- IPv6
AAAArecords are optional
- IPv6
- For the
TXTandCNAMErecords you will need to use your own GitHub username!
⚠️ Warning: Your domain won't work until you verify your email address / domain. I had to request a new verification email. Once verified your domain status becomes Active.
# How to Setup Your Squarespace Domain for Netlify
- Login to your Squarespace account (see steps 1 to 3 above)
- Click on your domain
- Go to DNS, and then DNS Settings
- Add custom records as per screenshot

- No need for a
TXTrecord - The
ALIASrecord is the primary method to configureDNSto Netlify servers - The IP address for the
Arecord is the fallback to configureDNSto Netlify servers - The
CNAMEis your sites name. This allows automatic redirects fromwww.example.comtoexample.com
# How to Add a Custom Domain on GitHub Pages
By default your domain on GitHub Pages will be [username].github.io but you can easily add a custom domain. For full documentation visit Configuring a custom domain for your GitHub Pages site on GitHub.
- Verify your domain
- Create a CNAME file in the root of your repository with one line containing your domain. Note, you only need to do this if deploying your site via GitHub Actions
- Go to your repository Settings
- Click on Pages
- Add your domain to the Custom domain section and click Save. Note, if you're deploying your site from a branch clicking save will make a commit and add a CNAME file (step 2)
- Test by navigating to your custom domain. Be patient, DNS changes can take a couple of days to flow through the web of the internet. Once my domain was active it took less than an hour
# How to Add a Custom Domain on Netlify
By default your domain on Netlify will be [sitename].netlify.app but you can easily add a custom domain. For full documentation visit Configuring a custom domain for your Netlify site on Netlify.
- Login to app.netlify.com
- Click on your site from the main pane
- From the site sidebar select Domain management
- Click Add a domain
- Click Add a domain you already own
- Enter your domain name
- Follow prompts
DNS will then propagate through the internet and your domains will verify - this can take up to 12 hours.
Once verified Netlify will automatically create TLS certificates with Let's Encrypt to enable HTTPS for your site, the HTTPS section of the Domain management page will show configuration once created. You can verify your custom domain and HTTPS by going back to the site overview tab, you should now see your site name with your custom domain underneath. Click the link and you'll see the padlock in the address bar (if you tried before Netlify created your TLS certificate your browser may have prompted an insecure site message).
# Bonus: Email Forwarding
Squarespace allows email forwarding. You can create an email alias such as [name]@example.com which is then forwarded to another email address such as a Gmail address. I use email forwarding on my site for contact via Email. You can configure email forwarding from your domain settings.
# Wrap Up
For less than a haircut you get an elevated, more professional online presence which suits the purpose of my site. If you're just making a simple hobby site then you may not want to bother, but it's another new skill you can learn, this time in the networking and DNS space 🥷
Thanks for reading 🤙
- ← Previous post
How to Add a Favicon to Your Website - Next post →
Bringing it All Together