How to configure search for your website
Being able to search across a website is a helpful capability and I want to give readers of my blog the ability to find information across my posts.
📅 26 January 2025 | 🕒 16 minutes to read
♻️ Update 02/03/2025
I've updated this post with steps required to setup Pagefind with Eleventy.
There're a number of options available to add search capability to your website, examples include, Algolia, Lunr and Pagefind.
I went with Pagefind. Pagefind is easy to get started with, even with limited JavaScript knowledge. The setup documentation is good, although I found it wasn't accurate for customising the CSS, however I was able to work through this to get an end product I was happy with.
# Getting started
Pagefind indexes your site after it builds so the first step is to add some search functionality or a user interface. I created a new page called search.html and added the following code as per the Pagefind Quick Start Guide:
<link href="/pagefind/pagefind-ui.css" rel="stylesheet">
<script src="/pagefind/pagefind-ui.js"></script>
<div id="search"></div>
<script>
    window.addEventListener('DOMContentLoaded', (event) => {
        new PagefindUI({ element: "#search", showSubResults: true });
    });
</script>
pagefind/pagefind-ui.js will be created after the site is indexed. These assets are added to the /pagefind/ directory in your site's output folder _site.
# Installing Pagefind
To install Pagefind, open a terminal and cd to your site, or open your sites folder in VS Code and use the inbuilt terminal there. Enter the following command: npm install pagefind
💡 Tip: If you don't have
npminstalled check out Downloading and installing Node.js and npm
# Running Pagefind
To run Pagefind enter the following command in your terminal: npx pagefind --site [output directory]:
Jekyll example where the output directory is _site:
npx pagefind --site _siteEleventy example where the output directory is dist:
npx pagefind --site distYou'll then see Pagefind index pages in your terminal.
If you serve your site and navigate to your search page you should see a search box interface that you can test out your new site search!
📝 Note: If you build your site with Eleventy, installing pagefind will add it as a dependency to your
package.jsonfile.
# Customising the Search interface
Pagefind has guidance on Customising the UI styles, below is an example of how I've implemented this to change the colours for some of the components.
#search {
  --pagefind-ui-primary: #004225;
  --pagefind-ui-text: #393939;
  --pagefind-ui-font: -apple-system, BlinkMacSystemFont, "Segoe UI";
}
I didn't go down the rabbit hole of trying the customise how the search results displayed, I was happy with the output.
# Adding Pagefind to your GitHub Actions Workflow for Jekyll
So we've got Pagefind indexing the site locally, a styled search box and the functionality works... awesome! But now we need to index our site at build time for production. To do this add the following to your GitHub Actions workflow for building your Jekyll site before deploying to GitHub Pages.
Add the following workflow step under the Build with Jekyll step. If in doubt check out my Jekyll workflow.
  - name: Run Pagefind
        # Indexes the site to the _site directory post build
        run: npx pagefind --site _site
And viola, Pagefind will index your site after Jekyll builds the site, and once deployed, your live site will have search capability! 🚀
# Indexing your Site with Eleventy for Netlify Deployments
How can we index our site at build time for production Eleventy deployments to Netlify?
In your package.json file add a new script:
"build:search": "npx pagefind --site dist"You can then use a build or deployment script to give Netlify as a build command:
"build": "npm-run-all build:*"The build * wildcard here includes any build scripts you have such as build:sass or build:eleventy. The script executes sequentially in alphabetical order which is fine for us because Pagefind needs a built site to generate search indexes.
# Adding a filter
➕ Added 18/03/2025
I've added tags to my blog posts and I wanted to iterate the search functionality to use the tags as search filters. Here's how you can do this using Pagefind.
- Add
data-pagefind-filter="tag"to the tags list section of your layout. For example:
<p>🏷️ <a href="/tags/search/"data-pagefind-filter="tag">search</a>, <a href="/tags/pagefind/"data-pagefind-filter="tag">pagefind</a>, <a href="/tags/jekyll/"data-pagefind-filter="tag">jekyll</a>, <a href="/tags/eleventy/"data-pagefind-filter="tag">eleventy</a></p>-
Run Pagefind
npx pagefind --site dist -
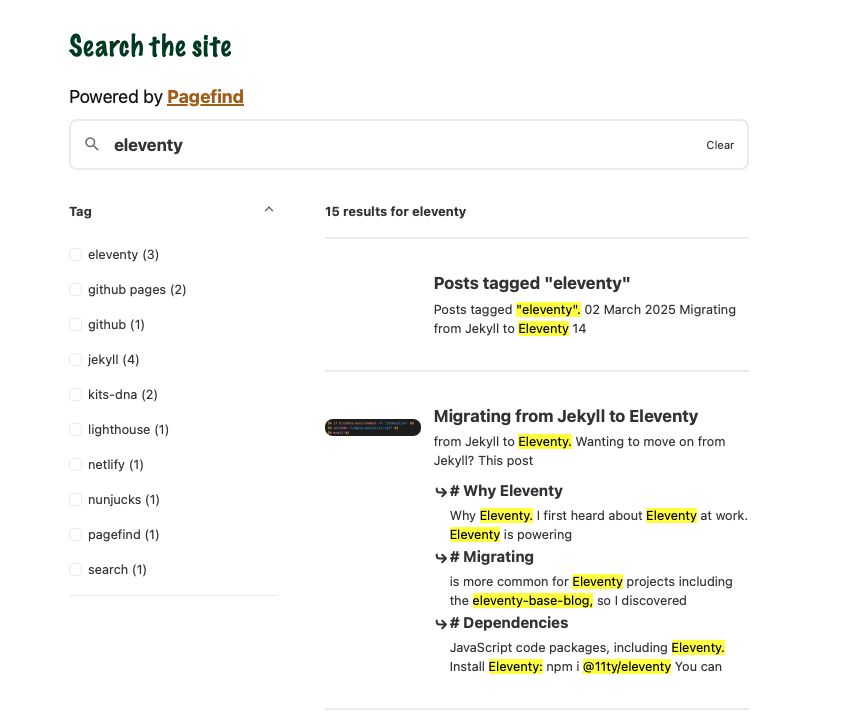
Go to your search page. You'll have a filter called
Tag, by default the filter will display in the search UI sidebar.
The filter will be closed and you'll need to click the arrow to open it. You can change the Pagefind script to open your Tag filter and remove empty filters by adding the following to your search script:
showEmptyFilters: false,
openFilters: ['tag']
The end result looks like:

# Wrap Up
We've now got free search capability on our site that allows our visitors to check out if we've written about other useful things (or helps me find things I've written about). Click the 🔍 on the header bar and try searching across this site, if it doesn't work, let me know!
# Coming Up
I spent a couple of hours before Christmas adding this feature to kits-dna along with adding a workflow for Google Lighthouse, adding a dark mode toggle and updating the sites headers and footers. I'll post about how to add Google Lighthouse next because it allowed me to make some improvements (with more to make).
Thanks for reading 🤙
- ← Previous post
Bringing it All Together - Next post →
How to setup Lighthouse for your website